

I have made a few dolls through the years. Some are featured in my post last fall: Toys In the Attic. In August, something triggered a compulsion to make dolls, so I went to my closet and started pulling out bits and pieces of fabric, paints, buttons and batting. In the past couple of months, I have made ten dolls. Seven of those dolls are awaiting their destiny and will be introduced in a future post. The dolls featured here are my own designs. The giraffe and elephant were my first designs. Since I was unsure how they would turn out, I did not document the process. By the time I started the camel, I had an idea how to work through the steps without multiple do-overs. Photographs documenting creation of the camel are included below.
High-Brow Giraffe

The giraffe came first. At about 12 inches tall, he is made of muslin. His long slender neck and legs made him the most difficult of the three to turn and stuff. Insulated wire was inserted from face to tail to keep his neck straight and upright. Once the body parts were stuffed, he was painted with acrylic paint. Embroidery thread was used for his mane. The legs were attached with carpet thread.
Typically, it is not until the animal is painted that I recognize the personality and decide how to dress it. The eyelashes almost made this a lady giraffe. His little horns stick up through the hat, but are only visible from the back. Perhaps next time his horns will be longer.
Typically, it is not until the animal is painted that I recognize the personality and decide how to dress it. The eyelashes almost made this a lady giraffe. His little horns stick up through the hat, but are only visible from the back. Perhaps next time his horns will be longer.

Elegant Elephant
The elephant design was more challenging because I wanted the animal to be facing forward. Trunk and tusks had to be sewn and stuffed in a way that made them separate from the body. I am happy with the result, but the pattern needs improvement to make it easier for the next elephant.

The fabric used had a shadowy floral design that I had envisioned would be perfect for the elephant. However, once the body parts were completed, I decided she needed more color and painted the flowers using acrylics and permanent marker.

Attaching the head to the body created a seam at the base of the head that I covered with ribbon and ruffle. With some work on the pattern design, I should be able to make that seam easier to hide.

SophistiCamel
The animals are somewhat flat, so the first step is to decide how the body will be oriented, that is, facing forward like with the elephant, or sideways. Most work best facing sideways, but I always want the face forward.
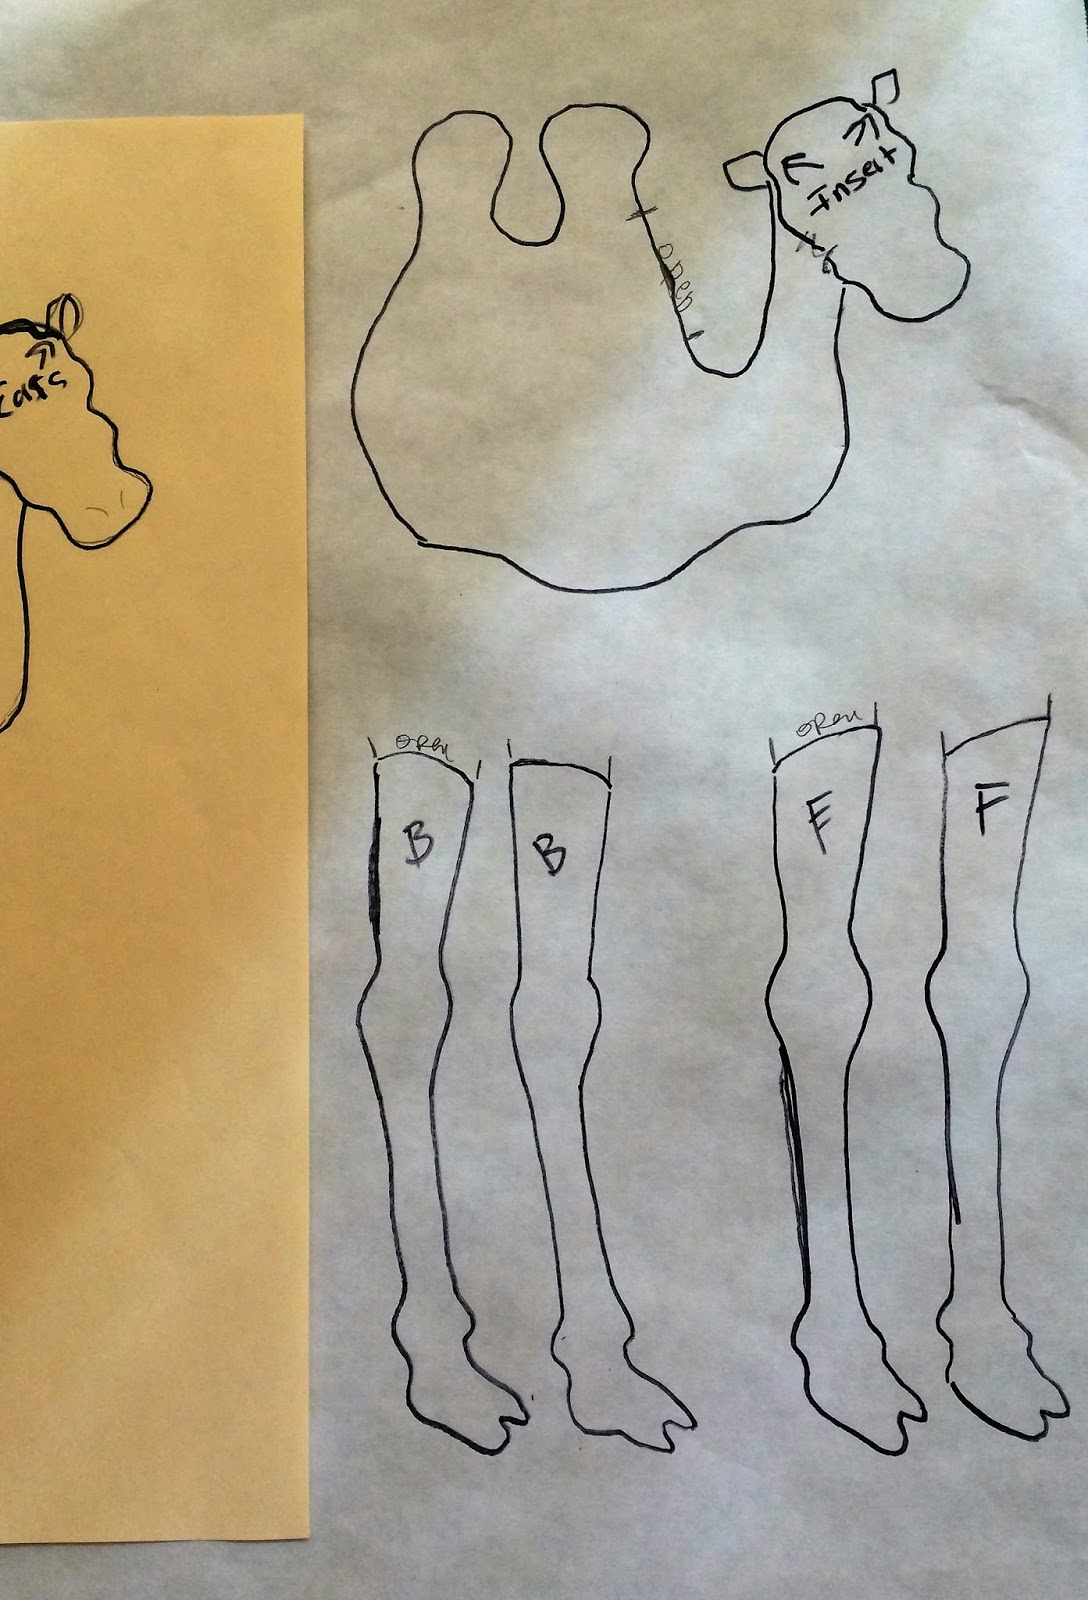
The camel drawn on the pink paper was first concept. Since I wanted the final animal to be about 12", the image was transferred to 8-1/2 x 14 paper.
The camel drawn on the pink paper was first concept. Since I wanted the final animal to be about 12", the image was transferred to 8-1/2 x 14 paper.

When happy with the shape, the outline was darkened with permanent marker so I could trace onto freezer paper. I made notes on the pattern pieces to remind me of any features or steps I might forget.
An iron-on stabilizer, like Heat N Bond, was used on the backside of the fabric. Fabric was folded over and the cut-out freezer paper pattern pieces were ironed onto the wrong side.

Another decision point was where to leave open the body for turning and stuffing. It should be some place that would be covered with paint or a decorative feature. The body area leading up to the first hump was left open because a mane would be added over the seam. This position, however, made it difficult to stitch closed after it was stuffed, so next time, the opening will probably be at the bottom of the body.
Leaving open places for turning and stuffing, I used free-motion stitching to stitch around the pattern pieces. Each piece was stitched twice to make sure all seams were secure.
The pieces were cut out with a scant 1/4" seam. Clipping curves and corners ensure well-defined shape once turned.

Here the pieces are turned and ready for stuffing.

Once stuffed, the fabric was painted. Since this fabric had a busy design, I simply embellished the design with metallic acrylic paints. Yarn was used for his mane. The felt hat was not what I had envisioned when I started making it, but turned out funky enough to work for a SophistiCamel.


Thank you for coming to visit. Please watch for my next post, Dolls for Doernbecher.