 |
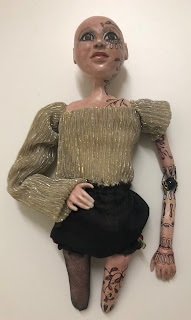
| Ivy is made of paper clay. She is 16 inches tall, and jointed at shoulders, elbows, hips and knees. |
I am rarely without a lineup of hobby ideas waiting for attention. Because my work-space does not allow room for multiple projects at a time, I typically complete one project before moving on. A thread-sketched greeting card can take about eight hours from sketchpad to completion. A larger thread sketch may take about 40 hours. Forsaking Christmas cards and housekeeping, I worked on Ivy for more than 100 hours in December. I have enjoyed every minute. Read on for pictures and explanation of how Ivy came to be, including some of the trial and error. Here are more links for pictures without words:
- Periodic progress pictures on Urban Stitcher Facebook Page
- Slideshow video of Ivy on Urban Stitcher YouTube Channel
- Listed for sale on Urban Stitcher Etsy Shop
Design
 |
| After days of adding ideas. |
Many decisions are made as I go, but a few decisions must be made at this stage, including how the doll will be jointed. This dictates hole placement and how the limbs will be shaped to accommodate the beads.
Paper Clay Parts
Her head began with a bit of tin foil wrapped around the end of sturdy wire. The wire extends down into the soft body for stability. I add thin layers of clay over several days allowing the layers to dry before adding another.
Legs and arms were first created without hands and feet. Because the hands are so small, it is easier to create them separately and affix later. The shoes take shape later only because I have trouble settling on a style. I used a skewer to make holes where the doll would be jointed. It is important to pay attention to hole location because it dictates the angle at which her legs and arms hang.
Soft Body
After the clay body parts were shaped, I created a soft body using muslin and stuffing. The opening is at top so the wire can be slid into the body. Waxed thread was used to attach head and upper torso to the soft body. The body could be made of clay. I prefer soft body because the clothing can be sewn rather than glued to the body.
Skin and Facial Features
Although touch-ups and additional detail can be added later, it is easier to add skin color, and in Ivy's case, tattoos, before attaching arms and legs to the body.
For Ivy' skin color I used chalk and powdered eye shadow. I like the look rather than paint, but it is a time-consuming effort. Each layer of chalk and powder had to be buffed before adding a second layer until reaching the desired color. Eyes and Lips were colored with acrylic paint.
Satisfied with skin color, the tattoos were first lightly drawn with pencil. Then, very carefully, for days and days, I drew the tattoos. Micron pigma archival ink pens were used. I do not have a steady hand, so this was pain-staking. A little burgundy acrylic paint was added using tiny nail art design paint brushes. After skin detail was complete, I used a small amount of PaverPol as a sealant. Paverpol is a textile hardener, not expressly meant for paper clay. I use it because I do not like brush-on varnishes nor do I have a place to spray varnish. The Paverpol adds a layer of protection to the clay surface and is non-toxic. Care must be taken, however, when brushing Paverpol over the chalk. Overworking the Paverpol can lift and smear the chalk.
The eyes are always the most difficult for me. A steady hand is required to add so much detail in the tiny area. Some of the paint was applied with the point of a straight pin.
Shoes
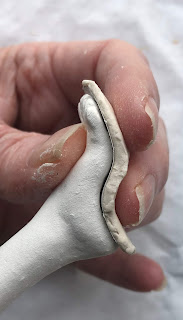
It would have been easier to mold the shoes as part of her foot, but I wanted a sandal look that I felt required building the shoes separately.
The shoes were created in stages allowing clay parts to dry before adding a new element. I cut a sole from clay, shaped it to her foot and let it dry separately. After the sole dried to shape, the grosgrain ribbon across the toe was sized and secured between the sole and platform. When that dried, the heel was added. The shoes were painted black before securing to her feet. The shoe back and ankle strap, made of ribbon, were added after gluing the shoe to her foot.
Adding Limbs
Stringing the doll is an exciting time. Each doll goes together a little differently and it seems a personality starts to emerge. The shape of the limb at the joint dictates how the limb will move. Ivy's elbows and knees are rounded, making the joints more loose than a blunt shape. I used 10mm beads with a 1.2mm hole size and 1mm flat waxed thread. The thread passes through the bead hole twice. It is a cozy fit, but it works. I use a small gold metal decoration on each side of the bead. I don't know what they are called...I found them in the beading department at Craft Warehouse.
Dressing the doll requires a lot of handling. Dangling arms and legs can hinder the process. If the clothes allow, lower legs and arms are not attached until the end. Because Ivy has one long sleeve, I attached the lower arms before making the clothes. If lower arms are attached at this early stage, care must be taken to protect her fingers and hands from flopping around and banging on the work surface.
Clothes
Clothes are fun. Although I start with clothes in mind, often it is trial and error before I find something that suits her.
I usually start with simple underwear. I had originally planned to have several skirt layers. I made a ruffled black organza skirt to fit under the gold, but decided against it.
The corset bodice took a little time in fitting and re-fitting. It is a good example of why I have a closet full of bits and pieces of fabric and trim. The smallest bit may be just the right size!
Hair
I had an old, inexpensive doll purchased years ago when I was making American Girl doll clothes for our granddaughters. I spent several days cutting her locks and remaking them into wefts that could be used for Ivy. Once I had it ready for styling, it made her look totally different than I had envisioned. So, I was back to eyelash yarn. I purchase most all my eyelash yarn on Brokemarys Etsy shop. She has a variety of unusual threads and yarns, and I can purchase small skeins perfect for my needs. After experimenting, I am happy with the crocheted wig using black and burgundy eyelash yarns.
 |
| Creating wefts |
 |
| Wig cap from pantyhose |
 |
| completed wig cap before adding synthetic hair |
 |
| Not the look I wanted |
Finish
 |
| Button earrings were fashioned with clay and paint. |
I wrapped Ivy's hair in plastic wrap to protect it from glue while doing the finish work. False eyelashes were applied. They can be trimmed, but I like the over-the-top look of the long lashes.
 |
| Ivy on her display board |
At long last, her lower legs were sew on and she was complete.


