Straps were also a consideration, cork or nylon polypropylene. This pattern calls for 1-1/2" straps. That's pretty wide and I was afraid cork straps would be too stiff and heavy, so I chose a nice lightweight polypropylene from Strapworks.
I chose a heavy duty polyester thread #69 T70. It is not bonded, so ravels a bit, but with some patience and a little practice, it really looks nice. I will sometimes use a bonded nylon #69 T70. Unless I am sewing straps or an area where the bobbin thread will be visible, I use regular polyester thread in the bobbin. Keep in mind, a larger needle is required with the heavier fabric and thread. I use a jeans needle 110/18.
Choosing to top stitch with a heavy thread in a coordinating color is a design choice that takes a lot of commitment. If the stitches are a feature, they need to be straight and even. I think small wobbles are acceptable in handmade bags. But, too many wobbles will have you pulling threads and trying to stitch again in the same holes that were created the first time you top stitched on your cork!
This bag calls for two different hardware sizes, 1-1/2" for straps and 1" for the strap closure. I modified the closure by replacing the two 1" D-rings with a single 1" D-ring and a 1" swivel hook. I added a 1/2" swivel hook for a key strap.
No interfacing was required with my fabric choices.
Putting It Together
It takes a while to cut everything out. Even without interfacing, this pattern has 21 exterior and interior pieces to cut. The pattern came with labels to help stay organized.
The pattern calls for a pleat in the front pocket. I made the pleat on the cork and Pendleton wool bag, but it was problematic. The pleated pocket, pleated lining and zipper created 7 layers that my machine did not like. I simply left the pleat out on this one.
I used 6mm rapid rivets to secure the bottom closure. I like to add a cork "washer" behind the rapid rivet to protect the fabric. The Cordura and cork are very strong and tear resistant, but it's a bit of insurance against wear and tear. Where both sides of the rivet are visible, I used 6mm double cap rivets.
The
inside front of the bag is neat and tidy.
I used two rows of top stitch, so seams are flat and secure. The side seams and boxed corners are not top stitched. To ensure durability, I sewed the first seam according to the pattern. Then, I flipped the bag over and stitched
again next to the first line of stitches, just inside the seam allowance. Now I have two rows of stitching with heavy duty thread on both sides.
I also used a zig-zag stitch on the waxed linen seams to ensure no
ravel. Strong!
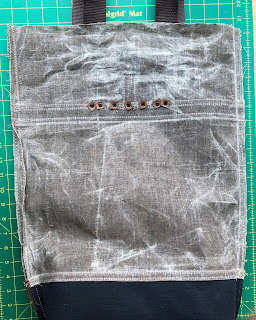
This is the wrong side of the exterior back. Straps are attached and finished with rivets. The waxed canvas is really starting to build personality. I like it more with every new wrinkle!
Lining
The lining is great place to make it your own bag. It's easy to add or change pockets to suit your preference. These two smaller pockets and the key strap are not part of the pattern. They are features that add a lot of convenience, especially to a tall, narrow bag where small items might get lost.
The pattern calls for a large slip pocket, but I like to use a zippered or welt pocket that hangs between the lining and the bag exterior. It provides a nice place to turn the bag right side out rather than having an 8" seam at the bottom of the bag. I actually did not need to turn this bag, I used a drop-in method, but this pocket is so easy and attractive, I used it anyway. I use this same method for a zippered pocket but chose to make a welt pocket for convenience and easy access in this deep and narrow bag.
The side seams on the lining are top stitched. This is a little hard to do....like sewing in a tunnel. But, it really helps the lining to hang better.
Any top stitching that does not start/stop at a seamed edge gets special treatment. This picture is not great, but it shows that I have left the thread tails long at the beginning and end of the top stitch. I pull these threads to the back and hand knot them along with the bobbin threads. I touch the knot with a bit of glue so they do not unravel. This makes a clean top stitch with no obvious stop/start point. It is time consuming, but makes a big difference in the finished look.

It is always hard to accurately capture the interior. Keeping the bag open while eliminating shadows is almost impossible. In this picture, I am preparing to sew the lining into the exterior. Because the top is fold-over rather than zippered, a drop-in lining works well. I did it a little differently than the pattern for several reasons. The main reason was to reduce the impact on the waxed canvas. Turning the bag using the "birthing" method would add a lot of wrinkles to the waxed canvas. I like the wrinkles, but I want them created naturally through use, and not necessarily being crunched up while passing the bag through an 8" opening in the pocket. This method makes it a little harder to make a straight and tidy top, but it can be done with patience and care.


